A great home theater is about geometry, not budget. Put the screen at eye level, sit the right distance away, and place speakers at the right angles — and even a modest setup feels cinematic.
Who's this for? Anyone planning a home theater in a NYC apartment, living room, or dedicated room — before buying a single piece of gear.
This guide covers screen height, viewing distance, speaker placement, lighting, acoustics, cable management, and how to make it work in small or odd-shaped NYC spaces.
The short answer
- Screen height: center of the screen at seated eye level — roughly 42 inches off the floor for a standard sofa.
- Viewing distance: for a 4K TV, sit 1 to 1.5 times the screen's diagonal away. A 65-inch set wants roughly 6 to 8 feet.
- Speakers: left, center, and right across the front at ear level; surrounds slightly above and to the sides; subwoofer in a corner or along the front wall.
- Light: motorized shades kill glare; soft bias lighting behind the screen reduces eye strain.
- NYC reality: small, odd-shaped, multi-purpose rooms with plaster or brick walls change everything. Plan the layout before buying anything.
Book a consultation or read about our full home theater installation service — equipment included in the quote.
Screen height and eye level
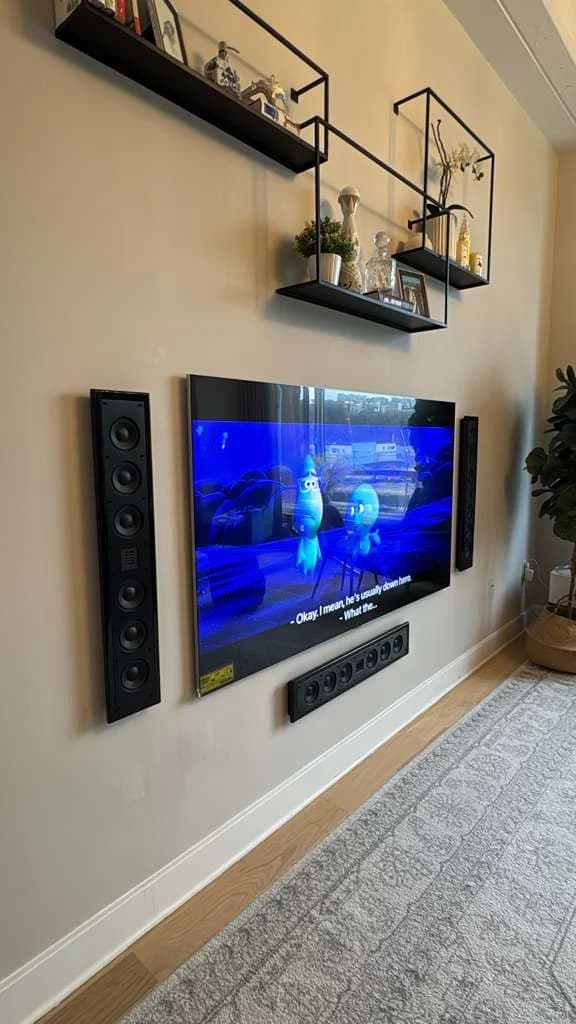
The most common mistake we see: TV mounted too high. People hang it above the fireplace or near the ceiling because it looks tidy, then spend every movie night craning their necks upward.
The fix is simple: the center of the screen should sit at or near your seated eye level — about 42 inches off the floor for most adults on a normal sofa. That means the middle of the picture, not the top edge or bottom of the bezel.
For a 65-inch flat panel, that usually puts the bottom of the TV around 25 to 30 inches off the floor. If your only option is above a mantel, tilt the screen down slightly — and accept that it's a compromise. Our TV mounting height guide has the exact math for fireplaces, bedrooms, and standard living rooms.
| Seating type | Approx. eye level | Suggested screen center |
|---|---|---|
| Standard sofa | 40–44 in | ~42 in |
| Low lounge / sectional | 36–40 in | ~38 in |
| Bar stools / counter | 48–54 in | ~50 in |
Projector screens sit a little different. Because the image is larger, center the screen so the lower third aligns with eye level — this keeps the whole picture comfortable without making you look up.
Viewing distance and screen size
Screen size and seating distance are two halves of the same decision. Buy the screen to fit the room, not the other way around.
For a 4K display, the comfortable range is roughly 1 to 1.5 times the screen's diagonal from your eyes to the panel. Closer feels more cinematic; farther is more relaxed and easier on the eyes.
| Screen size | Cinematic (1x) | Relaxed (1.5x) |
|---|---|---|
| 55 in | ~4.5 ft | ~7 ft |
| 65 in | ~5.5 ft | ~8 ft |
| 75 in | ~6.5 ft | ~9.5 ft |
| 85 in | ~7 ft | ~10.5 ft |
| 100 in+ (projector) | ~8.5 ft | ~12.5 ft |
In a typical NYC living room of 11 to 14 feet, a 65 to 75-inch TV is the sweet spot. Go bigger only if you can pull the seating back. If you're torn between sizes, our recommendation tool and Find Your Setup quiz help you match screen, seating, and budget without guesswork.
Seating arrangement and secondary seats
The best seat is centered on the screen at the right distance, with sound arriving from all sides evenly. That's your primary seating position. Everything else builds around it.
A few principles:
- Center the main row on the horizontal middle of the screen. Off-axis seats lose picture quality and stereo balance.
- Leave breathing room behind the seating. Sound reflecting off a wall directly behind your head muddies dialogue. Eighteen inches of clearance helps.
- Plan secondary seats for corners and a second row. They'll never be perfect, but angling them slightly toward the screen and keeping them inside the speaker coverage softens the penalty.
In larger spaces, a riser for the back row keeps sightlines clear. In a standard apartment, you rarely have the ceiling height for that — stagger the furniture instead: sofa forward, accent chairs flanking and slightly back.
Sightlines, windows, and glare
NYC apartments are full of windows, and windows are the enemy of contrast. Afternoon light across a screen washes out blacks and makes even a premium display look ordinary.
Map your sightlines first: sit where you plan to watch and look for any window, mirror, or glossy surface reflected in the screen. Then control it.
- Motorized shades are the cleanest solution. Trigger them with the same remote that dims the lights and starts the movie.
- Position the screen perpendicular to windows rather than facing them, so light rakes across the wall instead of bouncing into your eyes.
- Matte screens and anti-glare panels help, but they can't fully beat direct sun. Shades do the heavy lifting.
In a dedicated room you can simply have no windows. In a living room, blending shade automation into the layout is what separates a polished install from a pile of equipment.
Speaker placement
Speaker placement is where a layout earns its keep. Even modest speakers placed correctly outperform expensive ones placed badly.
Front three (left, center, right)
The center channel carries most dialogue — it goes directly below or above the screen, aimed at ear level. The left and right speakers form a triangle with your primary seat, angled inward so they point roughly at your ears. Tweeters at ear level, about 40 inches, is the target.
If you're starting simpler, a quality soundbar covers the front three in one bar. See our soundbar mounting service and how to mount a soundbar guide for clean placement under any screen.
Surrounds
Surround speakers sit slightly above ear level and to the sides or just behind the seating — never aimed straight at your head. They fill in ambience and effects, so they should be felt more than heard.
Height channels and Atmos
For object-based audio, add in-ceiling or up-firing speakers above and slightly in front of the seats. This is the layer that puts rain overhead and jets flying across the room. Our Dolby Atmos guide covers the full 5.1.4 and 7.1.4 layouts in detail.
Subwoofer
Low frequencies are nearly omnidirectional, so the sub has flexibility — but placement still matters. A front corner gives you the most output; along the front wall gives smoother, more even bass. The classic trick: the subwoofer crawl. Put the sub in your listening seat, play bass-heavy content, and crawl around the room until you find where it sounds best. Put the sub there.
Lighting and bias lighting
Lighting sets the mood — and done right, actually improves the picture.
- Dimmable, layered lighting lets you go from bright (cleaning, conversation) to dim (movie) without total darkness, which causes eye strain.
- Bias lighting is a soft strip of light behind the screen aimed at the wall. It raises perceived contrast and reduces eye fatigue during long sessions. Keep it neutral white and modest in brightness.
- No fixtures in the sightline. Sconces and lamps that reflect in the screen are as bad as windows.
We install accent and bias lighting as part of a build. Read more about our LED accent lighting service for the wall-wash and cove-lighting touches that make a media wall look custom.
Room acoustics basics
You don't need recording-studio treatment. You just need to manage the worst reflections.
- First reflection points. Sound bounces off the side walls between you and the front speakers. A panel or even a bookshelf at those points sharpens dialogue.
- Bare floors and glass are reflective and harsh. A rug between the seats and the speakers tames it instantly.
- Soft furnishings (curtains, upholstered seating, fabric panels) absorb high frequencies and reduce echo. Pre-war NYC rooms with plaster walls and hardwood floors tend to be live and bright — a little absorption goes a long way.
- Symmetry matters. Try to keep the left and right sides of the room similar so the stereo image stays centered.
In a custom build we use acoustically transparent fabric panels that hide treatment and wiring while looking like a designed wall, not a science project. See real examples in our custom home theater installation write-up.
Cable management and infrastructure
Nothing kills the look of a great room faster than visible cables. Plan the wiring path before anything goes on the wall.
- In-wall routing is the cleanest finish — but it's a drywall-only technique. Plaster, brick, and concrete — common in pre-war NYC and brownstone buildings — don't allow safe in-wall cable fishing. In those rooms we use paintable cable raceways and surface channels that disappear once painted.
- Run conduit during any renovation. If you're already opening walls, drop empty conduit to every speaker and screen location. Future-proofing is nearly free at this stage and very expensive later.
- Power and signal together. A screen needs a recessed outlet behind it plus a signal path to your equipment. Our power and in-wall cable service and the hide TV cables guide walk through both approaches.
If you rent or live in a co-op, check building and board rules before any in-wall work. Many require approval, licensed labor, and a certificate of insurance. We carry general liability and umbrella insurance and can provide a COI when your building asks.
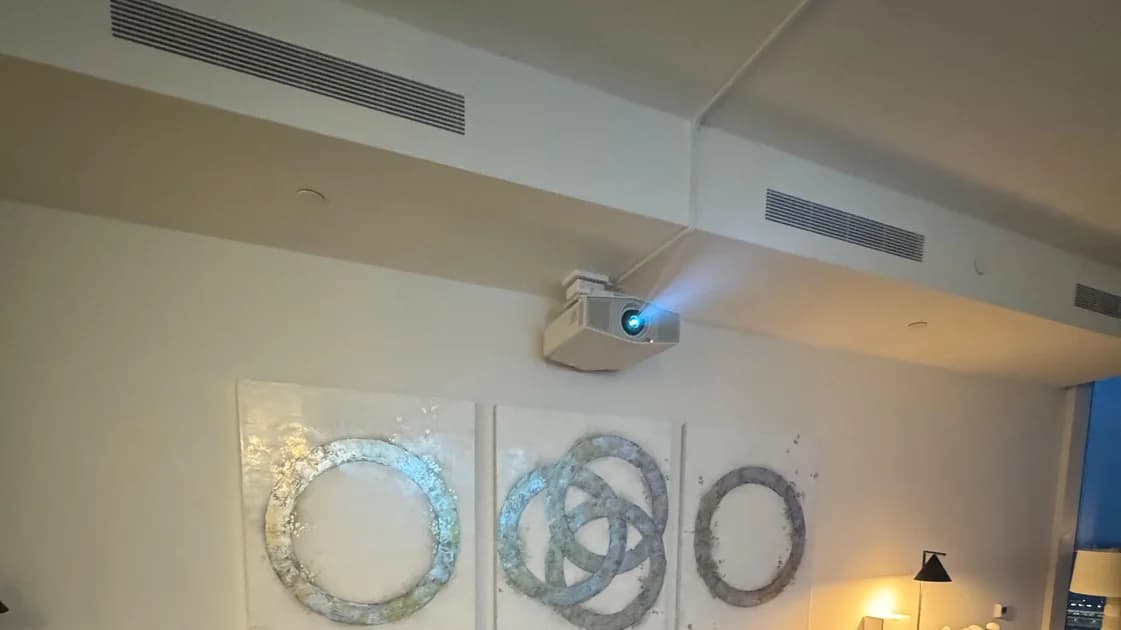
Projector vs. TV
Both can anchor a great room. The right choice depends on the space.
| Factor | Flat-panel TV | Projector + screen |
|---|---|---|
| Best for | Living rooms with ambient light | Dedicated, light-controlled rooms |
| Screen size | Up to ~98 in practical | 100 in to 150 in+ |
| Daytime use | Excellent | Needs shades or darkness |
| Setup complexity | Lower | Higher (throw distance, mount, screen) |
| Cinematic scale | Good | Outstanding |
A projector delivers the true big-screen feel but demands light control and ceiling space. A TV is more forgiving in a multi-use NYC living room. Weighing models and screen types? Our best home theater projectors guide breaks down throw distance, brightness, and laser light sources for apartment-sized rooms.
Small NYC apartments and multi-purpose rooms
Most NYC homes don't have a spare room to turn into a dedicated theater. The good news: you can still get cinema-grade results in a living room, studio, or den with smart layout choices.
- Mount, don't stand. Floor stands eat square footage. Wall-mounting recovers floor space and centers the screen properly. Where a stand is the only option, a floating stand keeps the floor clear underneath.
- Use the long wall. Place the screen on the wall that gives you the most viewing distance, even if it means rotating the room.
- Hide the gear. In tight spaces, in-wall speakers, a soundbar, and a small concealed rack keep the room feeling like a home, not an electronics store.
- Embrace dual-purpose. Motorized shades, dimmable lights, and an automated source switch let one room flip from dinner-party mode to movie mode in seconds.
- Odd shapes are workable. L-shaped and railroad layouts just need the primary seat squared to the screen; everything else flexes around it.
If your building is a NYCHA property, note that the wall construction is thinner than standard plaster or drywall and rated for lighter loads — wall-mounting and anchoring should be handled by a pro. When in doubt, book a consultation and we'll assess the wall in person.
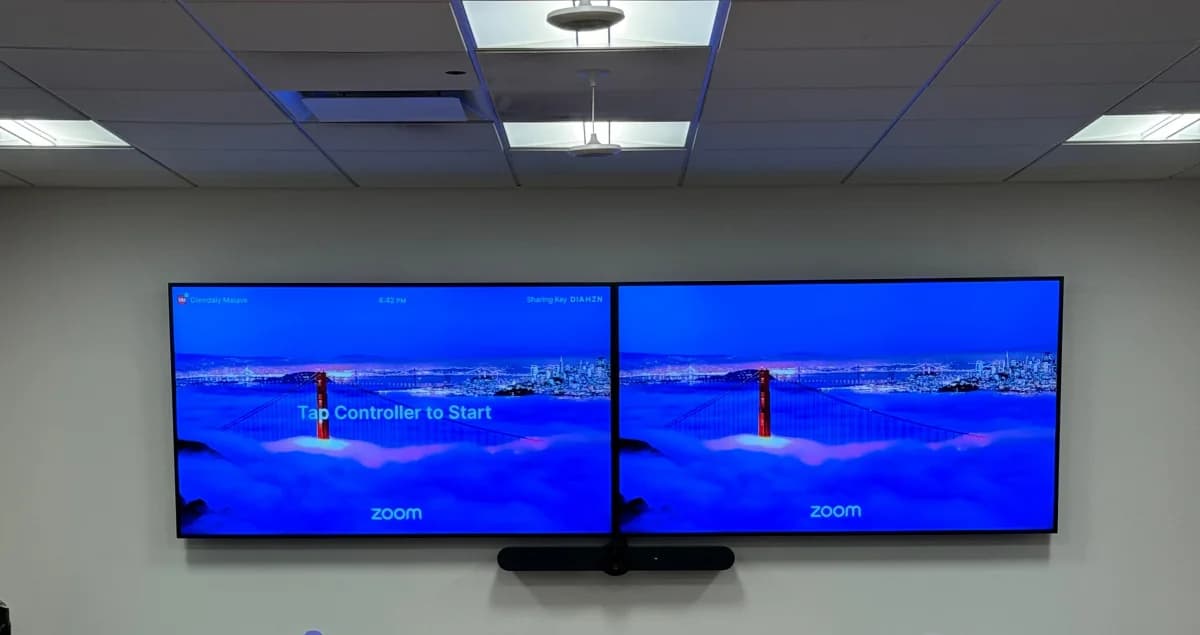
Commercial and corporate spaces
The same geometry that makes a great home theater makes a great conference room or boardroom: sightlines, screen height, even sound coverage, and controlled light. The scale and priorities shift — dialogue intelligibility and camera framing matter more than cinematic bass — but the layout discipline is identical.
We design and install conference room AV and boardroom AV for NYC and NJ offices, including video conferencing, microphone coverage, displays, and control systems. These are quote-based projects scoped to the room.
The layout checklist
Work through these before you buy or mount anything:
- Mark your primary seat. Sit where you'll actually watch and measure your eye-level height (target ~42 inches) and the distance to the screen wall.
- Pick the screen size from that distance using the 1 to 1.5x rule — not the other way around.
- Set screen center at eye level and confirm no window, lamp, or mirror reflects into it from your seat.
- Lay out speakers: center at the screen, left and right angled at your ears, surrounds to the sides and slightly high, sub in a corner or along the front wall.
- Plan light control (motorized shades, dimmers, bias light) and the cable path (in-wall if drywall, raceways if plaster or brick).
- Confirm building rules if you're in a co-op, condo, or rental — and line up a COI if required.
When to hire a pro
You can absolutely handle a basic setup yourself: hang a TV at the right height, place a soundbar, run a raceway. We document those steps so you can.
But once you're dealing with multiple speakers, in-ceiling height channels, acoustic treatment, automated shades and lighting, and concealed wiring across plaster or brick walls — the value of a professional design jumps. A pro gets the geometry right the first time, hides the infrastructure, makes the system simple to operate, and handles the permits, insurance, and building approvals that NYC living requires.
Our full home theater installation service is quote-based with equipment included, starting from around $10K depending on the room, the screen, the audio layout, and the level of automation. For straightforward jobs like TV mounting, your final price depends on the services and options you choose plus the distance from Midtown Manhattan — you'll see the exact total before you submit your booking request.
Book a consultation or call us at (646) 912-5050.
Frequently Asked Questions
What's the ideal home theater screen height?
Aim to put the center of the screen at your seated eye level — about 42 inches off the floor for most adults on a standard sofa. For a 65-inch flat panel that usually means the bottom edge sits around 25 to 30 inches up. Mounting higher (like above a fireplace) forces you to look up and causes neck strain over a long movie — tilt the screen down if a high mount is unavoidable. Projector screens center a little higher, with the lower third aligned to eye level.
How far should I sit from my TV or screen?
For a 4K display, sit about 1 to 1.5 times the screen's diagonal away. A 65-inch TV is comfortable from roughly 6 to 8 feet, and a 75-inch from about 7 to 9.5 feet. Closer gives a more cinematic, immersive feel; farther is more relaxed. In a typical NYC living room of 11 to 14 feet, a 65 to 75-inch screen hits the sweet spot. Choose the screen size to match your seating distance rather than buying the biggest set that fits the wall.
Where should I place the speakers in a home theater?
Put the center channel directly below or above the screen for clear dialogue, and angle the left and right speakers inward so they form a triangle aimed at your ears, with tweeters near ear level (about 40 inches). Surround speakers go to the sides or slightly behind the seating and a bit above ear level. The subwoofer can sit in a front corner for maximum output or along the front wall for smoother bass — use the subwoofer crawl to find the best spot. For height channels and Atmos, add speakers in or near the ceiling in front of the seats.
Can I build a home theater in a small NYC apartment?
Yes. Wall-mount the screen instead of using a floor stand to save space, place it on the wall that gives the most viewing distance, and hide the gear with in-wall speakers, a soundbar, and a compact rack. Motorized shades and dimmable lighting let a single living room switch between everyday use and movie mode. Odd-shaped and railroad layouts work fine as long as your main seat is squared to the screen. The main constraint is wall type: plaster and brick require surface raceways for cables rather than in-wall routing.
Do I need acoustic treatment in my living room?
You don't need studio-level treatment — just control the worst reflections. A rug between you and the speakers, curtains over hard windows, and a panel or bookshelf at the side-wall reflection points dramatically improve clarity. Pre-war NYC rooms with plaster walls and hardwood floors are acoustically live and bright, so even modest soft furnishings help. In a custom build we hide acoustic panels behind designer fabric so the room looks finished, not like a studio.
Should I choose a projector or a TV?
Choose a TV for a multi-use living room with ambient light — it stays bright and is simpler to install. Choose a projector for a dedicated, light-controlled room where you want a 100-inch-plus cinematic image. Projectors need shade or darkness control and ceiling space for the throw, so they're best in rooms you can darken. If you watch mostly in daytime or share the space, the TV is the more practical pick.
How are cables hidden in plaster or brick walls?
In-wall cable routing is a drywall-only technique. In pre-war NYC apartments and brownstones with plaster, brick, or concrete walls, fishing cable inside the wall is not safe or up to code — so we use paintable raceways and surface channels that blend into the wall once painted. If you're renovating and the walls are open, run empty conduit to every screen and speaker location to future-proof the room. Always check co-op or condo rules and provide a certificate of insurance if your building requires one before any in-wall work.